I'm talking about a garden people!!
Having a legitimate garden is something I have wanted for a long time. Sadly it was not an item that was on the very top of the house To Do list. With the work we have been doing in the back yard this month (moving the shed, tending to the grass, and mulching our path) we just picked it up one night because we weren't ready to stop working.
The majority of the yard is pretty heavily shaded but there is one section on the side of the house that gets a decent amount of sun throughout the day. It is its own little area that we didn't have any other ideas for so putting the garden there is perfect! This is also where our lemon tree is located, so it fits the theme well.
We have already done some work on this area. A long time ago we removed the overgrown bushes that were taking up space, we revived the irrigation well, and we moved the fence a little to make use of some dead space behind it.

Bush removal

Fence relocation

Well revival
I had planned all along to build raised beds for the garden. Perhaps one of the main reasons was to make use of the million and one pavers/cinder blocks we have dug up from our yard.

We started in the garden area by...oh wait, wait, I'll let you guess.
Take all the time you need.
You will never guess. Give up?
We started by PULLING UP MORE PAVERS!!! Duh.

Not sure if its clear, but everything you see in the above picture that appears to be the ground is actually a paver.
We're total pro's at paver removal though.

These are all the pavers we pulled from that little area (actually not even all of them, these are only the ones that weren't broken). They never stop I swear.

We already had planned the general idea of what our raised beds were going to look like and where we were going to place them. We roughly placed the first layer of blocks and played with the shape a bit until we liked what we had. No precise measurements here folks.

Once we were happy we went ahead and leveled the ground under the blocks and started stacking as we had planned/had enough blocks to build our box three cinder blocks high. Since these cinder blocks are older, their size is a little smaller than the average block you are accustomed to seeing. Because of their odd size, they didn't stagger well in a staggered fashion so we started by stacking on top of each other.

We had done some reading to determine if we needed to add any support to the walls to prevent the pressure of the dirt and plants from pushing them outward. After deciding that we didn't need to do anything extra, I knew that it wasn't going to work if we didn't stagger the blocks. There was no structural integrity at all. I went ahead and tried to stagger the cinder blocks. I had avoided this the first time around since this creates some gaps but it was 100% stronger and worth the trouble of filling the gaps.

To fill the gaps The Engineer simply used a hammer to break apart some extra blocks to fit the spots we needed filled.

I of course made sure that some red pavers we had would fit nicely in the alcove in the front of the bed ;-)
Our next step was to give the bed some height. From some research, I learned that crushed rock or gravel in the bottom improves drainage and also reduces the amount of soil you need to maintain. The only problem was getting said gravel/rock. Where on earth would we come by that?? Oh yeah, that's right. We have a huge pile of it behind the shop that we have found all over out yard that I had been saving for this exact purpose. Silly me.

I'm serious, this is real life. Free materials are nice though. We crushed up the pavers and rocks to smaller pieces and loaded our box.

To cover the rocks we used the dirt we dug up form the path in the back.
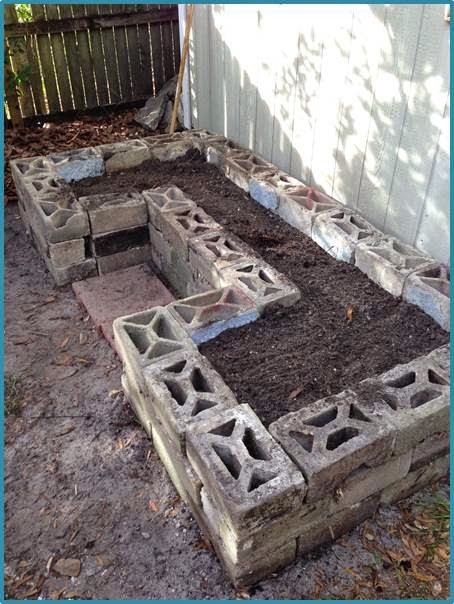
BAM! One raised garden box ready to go! For f.r.e.e. Woot! Ok, it isn't exactly 100% ready to go, but its great that we got this far from materials we already had. Things left to do:
1. Buy/make proper soil mix for top layer.
2. Build a face wall around it for aesthetic purposes (cuz it ain't pretty at the moment).
3. Plant plants.
We also went really wild and played with some options for a path through the garden. You know, cuz we had a paver or two hanging around.

Clearly we didn't level the rest of the area haha! Nothing has been decided about the path so don't hold me to it!
Thanks for stopping by, come back soon to see what else we have gotten ourselves into :)
No comments:
Post a Comment