Sunday, July 27, 2014

Burnin’ the Midnight Oil

Part II: DIY Dry Bar Installation (Part I and Part III)

We have been so busy around here guys, I have lots of stuff coming your way...if only I can find the time to sit down and write about it!!

I shared the planning process of our dry bar and left off with a pile of boxes on the floor. When we got them in the door we immediately started ripping everything apart. We first had to clear the wall we would be working on. Fortunately that only entailed emptying our kitchen storage armoire and relocating it into the office.


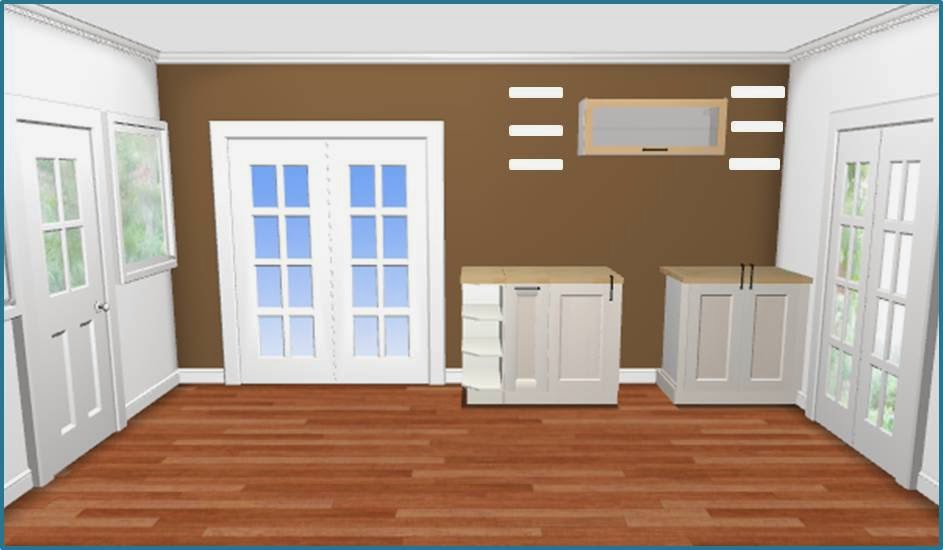
With that out of the way we could start building cabinets.


Safety first: fire extinguisher at the ready! I was actually slightly annoyed that we were left with the holes from the fire extinguisher mount. It would have been nice if they were covered up, especially knowing how many holes we put in the wall…but I’m getting ahead of myself J

The very first thing we did was pull off the base boards because we assumed that the cabinets would be hitting the top and they would need to be removed for the cabinets to sit flush on the wall. Well, we were wrong on that one. The cabinets have adjustable feet and by the time they were high enough for the kick plate to be installed, the base of the cabinet was above the base boards. So we put them back on. At least we got to clean behind them. That’s what we get for thinking we were being smart and doing things in the right order!

We stared off with the easy stuff and assembled all the cabinet bases. There were 4 units so to speak and from left to right we had: a 12-in end unit (this was open shelving on the end of the bar), a 12-in pull out drawer that will house our new recycling can (yay!), one 18-in cabinet, the gap for the wine cooler, and one 30-inch cabinet.


With IKEA stuff it’s the same assembly over and over so this part went by really fast. We left the inside components of the cabinets and doors for later to make it easier to move things around. Moving to the wall portion, we built the one upper cabinet and while I worked on the door The Engineer started to hang its mounting bar. This is where we hit our first road block. It wasn't a major problem but it did cost us a trip to Home Depot. I think deep deep down we knew that this was a masonry wall, but neither of us really remembered. Thus, when The Engineer tried to drill pilot holes in the wall he didn't get very far. That was fine because we picked up the appropriate mounting hardware and bits to mount the cabinet, the floating shelves, and secure the lower cabinets to the wall. I also got some paint for another project J

Once we were back on track we got the cabinet up pretty easily.


(At this point you will have to excuse the grainy pictures…it was dark and our lighting was limited)

What wasn't so easy was dealing with those floating shelves. Granted, most of the problems we created for ourselves with our modifications.

These were 12” IKEA LACK shelves designed to hang by two screws from the back. That’s fine, but before we mounted them we had to attach our lights to them. We used the GRUNDTAL spotlights from IKEA which came in a 3-pack, so we bought three 3-packs. One light for each of the 6 floating shelves and two lights for the inside of the wall-mounted cabinet. We might by another single light so later when we finish the wine storage below the cabinet we can mount two more lights on the bottom of that. We like it bright at our house!

The first obstacle was mounting the top two shelves. We couldn't use the mounting brackets they came with since they were the kind you hang over a screw and pull down to tighten (you can see these in below photos). This would have left about a ¼” gap between the shelf and ceiling which was unacceptable. Our first idea was to cut the back of the shelf out and build a frame on the wall that the shelf could then slide on to. I've seen this trick on many DIY tutorials for floating shelves. This solution was still a little complicated directly on the ceiling and would require some precise measuring and fabrication time. Then we realized that we had to drill a hole in the bottom of the shelf anyway to pass the cord for the light through…so we could just go through that hole and screw the shelf directly into the ceiling. Bingo! This was such a simple solution and it worked perfectly since it was only supporting its own weight ant the weight of the light, which didn't amount to much.

With a 1” hole drilled in the bottom and back, and a small pilot hole in the top of the top two shelves, The Engineer got to work mounting the top two shelves while I drilled holes in the bottom and back of the other four shelves so I could string the lights in.


I had a 1” hole to run the cord through and two small pilot holes so I could screw the light on.
I ran the wire through the hole in the bottom and out the hole I drilled in the back. I could then attach the light to the bottom of the shelf. Running the cord through the shelf was pretty straight forward once you got it through the honey comb paper inside.


We planned on running all the wires for the lights through the wall but our masonry wall was still giving us trouble. The drywall is appropriately attached to furring strips that are attached to the block, but one of those furring strips runs directly across the top of the wall. In other words, between the drywall and block, the furring strips create a space that we could run the wires through. In the case of the top two shelves though, we were stuck hitting the furring strip and couldn't get to the open space. We tried to drill at the lowest possible spot that would be covered by the shelf but couldn't get below it. We sucked it up and decided we would run the cords for these two along the ceiling and the rest through the wall.


Bam! One shelf down.

For the rest of the shelves The Engineer measured and pre-placed the mounting screws with drywall anchors while I was working on building the inside shelving and doors for the lower cabinets since the two-man operations were intermittent. For each shelf we used a wire snake to feed our wires though the wall and came back out behind the lower cabinets.

This worked very well until we got to the lights in the center cabinet. About 6 inches below our hole we were hitting something horizontal. We soon realized a window was formerly located back there and we were hitting the top valance (this was originally an exterior wall and is now an interior wall). Yikes. We ended up snaking inside the wall under the mounting bracket for the cabinet, coming out of the wall over the window valance, and back in the wall behind the cabinet and then the rest of the way down. It got complicated, but it worked!


I told you we ended up with a lot of holes in the wall! Even more exciting was that all the lights worked after they were installed.

It was about this time that we hit a stopping point and pushed the lower cabinets back in and called it a night.


We are so excited with how the area is looking. We need to find the right wine cooler and we really need our counter top to be in stock and we will be onto Phase III of the install...coming soon!

Monday, July 14, 2014

The Ball is Rolling

Part I: Dry Bar Installation (Part II and Part III)

Since we put the sunroom together we have been itching to get the other two ‘extra rooms’ to a functional state. We have the entry room/sitting room/wedontknowwhatthehecktocallit room and the office to work on. We have plans for both rooms but got really invested in the entry room since it is the connector between the sunroom and the rest of the house…ahem…and the entry to our home! We decided to ignore the office right now because it can hide behind closed doors.  

The entry room is…interesting. Our home was originally built in the 1950s as a 2/1. The entry room is the first room of the add-on portion of the house. It connects the original house via the kitchen to the added bedroom (aka the office) and the sunroom. And if you didn't catch on, it also has a second entry door. It is closer to the driveway so we use this door 99.9% of the time. Were you keeping track of the doors? There were 4. Four different doors on four different walls.

The entrance is a regular door.


The office has a set of French doors (that desperately need to be repainted, but that’s a job for another day).


There is a smaller set of French doors to the sunroom.


Finally, there is a large doorway through to the kitchen which has a vintage elevator door from a cigar factory in Ybor that is on a sliding track (and yes, it is as awesome as it sounds).


So, like I said, there are four different doors on each of the four walls, making this an interesting space to work with. Oh, and there is also a beam running through the middle of the ceiling…which happens to be two different heights.

Now something I consider lucky is that we need extra kitchen storage. We actually don’t have that much cabinet space even though the kitchen feels pretty spacious.


We defaulted to the exact same method of additional storage that the previous owners did which was to place an armoire on the only open wall in the entry room and fill it with the kitchen items that didn't fit in the kitchen.


So why do I consider it lucky that we needed extra kitchen storage? Well, without that need, I don’t know what the heck we would have decided to do with this space. At least needing some additional kitchen storage gave us a direction to go with the room. With that in mind, we came up with the idea of creating a dry bar. Do you hear the angels rejoicing like I do?

A dry bar would give us the kitchen storage we needed in the form of lower cabinets. Then everything above and visible would be a cool place for all our wine and beer J We were loving the idea and couldn't wait to get into this project since day one in the house because let’s face it, one lonely armoire in the entry room of your house that you see every day is so so sad.

We had been coming up with ideas for a while, but nothing too serious. Everything was on the back burner, that is until we finished the sunroom. You have to go through the entry room to get to the sunroom. After the sunroom turned out so awesome, we literally couldn't wait to give some functionality to the entry room. We spent the second half of our Saturday designing the dry bar. We were using IKEA’s online home planner (in case you are interested). It is a pretty good tool for visualization and spacing if you are using their products. We went through several iterations before we arrived at the final plan.

Originally we planned to have a tall pantry like cabinet on the left (primarily for that kitchen storage we needed) and a dry bar area with lower and upper cabinets on the right.


{Side note, all these plans are simply screen shots from the IKEA home planner. Also, our walls are a very light green (not lime green) and the white cabinets weren't showing up too well against them in the program, so as we move through the pictures you will also notice the evolution of the room in the background haha.} 

This was the plan from day one and for a long time after because we weren't really brainstorming that much about it. One alteration we did have to that was a ‘minimalist’ plan where we would use one of those pre-made kitchen islands or bar on wheel get-ups with some type of upper cabinet of the wall.


There were several problems with this plan. Although we could find plenty of options for the lower portion, there weren't a lot of budget friendly options (after all, the idea of a minimalist setup should include some dollar savings right?).  Another problem with this option was that the storage it was adding was open shelf storage and we were honestly trying to hide the rest of the kitchen stuff, not display it L

We then looked at a more traditional kitchen setup with normal lower cabinets and upper cabinets, jazzing it up with glass inlays in the upper doors.


We tried to make it a little different with the open shelving in the middle of both sets of cabinets.  This option was nicer to us and we liked it, but it just wasn't stealing our hearts. It just looked so heavy. 

It was at this point that we had one of our revelations. We didn't want this to be an awkward detached extension of the kitchen; we wanted it to be ‘cool’ and able to stand on its own. This was why we tried the open shelving out and they did add a little something. In reality though, what the heck was I going to do with a bunch of little 9 in by 5 in shelves? Nothing. I would struggle to fill those with stuff I don’t have and don’t need to buy. So we took them out and thought, “what if we could buy a wine cooler for a price similar to those shelves?”

We had looked at built in wine coolers, but they are expensive. The free standing ones are much more affordable, but technically you aren't supposed to build them into your cabinets because they will lose the air flow they need to operate properly. After a quick Google search we were confident that we could DIY building in a free standing wine cooler with enough space around it to maintain the air flow. Then it was on like donkey kong. We started to scour the interwebs for a free standing wine cooler that was equivalent to the cost of the shelves.  We knew once we found the right on that this would be the direction we wanted to head. At this point we removed the shelves from the lower cabinets in the plans and left a gap there where the wine cooler would eventually go.

Now our creative juices were flowing and we were starting to point the design toward awesome dry bar instead of weird kitchen extension. We shrank the upper cabinets and expanded our options up top with open shelving.


Sadly, in the home planner gadget we were using, we couldn't import every single IKEA product, so we had to go with our imagination. So in the above plan the floating shelves are missing. We were leaning toward the IKEA LACK shelves. They are simple floating shelves that come in three sizes (we had to default to the 12” because the other two options were too long for our space). We also planned to build some simple x-box wine storage to go below the two upper cabinets, as rudimentarily demonstrated below along with the floating shelves.


With the floating shelves, we planned to install lighting on the underside since we have that type of lighting in the kitchen and really like how it looks.

We were much happier with this plan, but it still wasn't there yet. I was really into having glass inlays in the upper doors and the smaller cabinets didn't offer this option. We thought about getting them anyway and doing the inlay ourselves, but that seemed counter intuitive to buy something new and immediately tear it apart to redo it. I save that stuff for the pieces I find on the side of the road J

The Engineer then saw a picture where the floating shelves were on the outside of the cabinet instead of the inside. He really liked it and came up with this plan.


It was looking pretty cool, but with the small shelves (3 on each side of the cabinet), and I was worried that they would get lost between the right side of the upper cabinet and the wall…they are only 11” deep. For your viewing pleasure, I again placed a really high tech representation of those shelves below.


I was liking it. Liking it a lot actually, but I wasn't loving it. We still planned to build a little wine storage under the cabinet.


At this point in the evening we went to Home Depot to do some price shopping. While we were looking at and planning with IKEA items, we knew once we got the general plan we could shop around other places to find what we wanted at the price we wanted. Long story short, we decided that IKEA was going to get us where we wanted to go. No complaints from this girl about another weekend trip to IKEA!

On Sunday we were in IKEA’s showroom bouncing back and forth between our plans and the merch. One of the first things we saw was this bad boy. The only difference was that the base of the one we bought was the same birch color that the door is. Apparently this is new so everything isn't updated on the website. 


It was the perfect solution to our upper cabinet problem! See, part of the fear I had with the last plan above was that the cabinet was too large and would overpower the floating shelves instead of creating a nice balance with them. This cabinet was half the size, it had my glass inlay that I just had to have (the double cabinet above only had frosted glass), and as soon as we put it in to the plan we loved it.


Of course, with shelves…


We debated where the top floating shelf should go. It would either be a normal shelf as depicted above, or mounted all the way up on the ceiling as an architectural feature, like below. Spoiler alert, option 2 won out. With the lights installed on the shelves, it looked really cool to have the top one at the ceiling. We didn't make the final call on this though until we actually had the shelves and were holding them up to the wall.


We made some final decisions in IKEA and placed the order.  And had a free lunch while our items were pulled! I guess the free lunch is new at IKEA…if you spend $100 you can take your food receipt when you check out and they will take that amount off your total! I’m not sure if this is a limited time only thing, or specific to our store, but we appreciated it!

We got home and unloaded the car just before the rain hit and got started working…


Stay tuned ;-)

Tuesday, July 8, 2014

WE HAVE A SUNROOM!!!

Are you as excited as I am?!?!

Probably not, but I’m ok with it. The sunroom has been a long time coming for us. The way I’m talking about it makes it sound like we build it on ourselves, but we didn't.  It was already part of the house when we bought it, but it wasn't doing anything more than acting as a storage area for random stuff.


With such beautiful floor to ceiling windows on three sides and a 1924 brick floor, this room was destined to be awesome…just not right away. If you remember, we moved in from a 2/2 apartment to our 3/2 house with a sunroom and entry room. We didn't quite have the furniture to fill the place. No worries, I've been secretly collecting items here and there J

One main item missing from the sunroom was a loveseat. We looked for a while and re-visited most stores until we finally picked this:


Looks comfey huh? Before the couch went into the sunroom it had to be painted, so actually getting the couch in the house inspired us to get the room together.

The back wall is wainscot panel which was just not my favorite as bare wood. Since I loved how the front entry turned out after a coat of white paint, I was excited to do the same for the sunroom wall. I cleared some space to work and gave the walls a once-over to dust/clean them before the primer. I also pulled a good number of nails form the wall and patched holes.


I taped the floor and used an angled brush to do all the trim. I then came back and primed the rest of the wall with my brush. Yup, with my brush. I tried to use a roller when I did the front entry way, but I couldn't quite get all the way into the grooves with the roller. So, for the primer and first coat of paint, I used a brush. Yes, It was time consuming.


The Engineer helped me put the first coat of white on which was a huge relief because it goes so much faster with two people when you aren't using a roller.


I did the edges one last time with the brush and then broke out the roller to get a good even coat. Fifteen minutes for the final coat compared to two or three hours for the previous coats with the brush was awesome! I was also pleased that I only needed one coat with the roller; mostly because that coat took all the white paint I had left! As the final coat of paint dried we cleared everything from the room that wasn’t supposed to stay there and gave the floor a good cleaning before setting everything up.


We started with the rug I got for my birthday (specifically picked out for the sunroom months ago). We thought it might be nice to have a little cushion under it since the brick floor was so uneven. We happened to have this old workout mat that we weren't using and after trimming about a foot off, it was a perfect fit! I’m so glad we did this because it is so much more comfortable to walk on with the extra layer than without!


We unwrapped the couch and brought in and nestled it into its little nook. This is probably the point when I fell in love.


Bringing the rest of the items back into the room was easy and fast. The room has come together so nicely!


To give you a little tour of the goods:

The chest we are using as a coffee table is from The Engineer’s grandmother and we were saving for this exact purpose once we got a loveseat.

The Engineer snagged the side table next to the couch from the side of the road that someone was throwing away. I just cleaned it and gave the surface a fresh coat of paint and we had a new end table for that loveseat too.

While hitting up garage sales one weekend we found that awesome artists easel for $15 and snagged it knowing we would use it in the sunroom to display art. Though, the jury is still out on what piece we will keep up there.

I bought the blue vase by the desk from home goods because I loved it and the little squiggly stick thingys are from Ikea.

The wire bikes were from our bicycle themed wedding and I love having that reminder when I look at them. The empty pots in the wire bikes are from TJ Max and I knew that the color of the flowers combined with the blue vase above would give the room some color splashes (these were some of the original things I had stashed for the sunroom).

For my birthday I asked for a few other items for the sunroom. The desk, rug, and lamp are all from Target and I love all of them. I leaned on white a lot because I knew it would pop off the dark floor very nicely. I also specifically wanted a shaggy rug to provide a contrast to the hard brick floor.

We hung some art on the wall…


We started a tradition when we got engaged in Paris (ridiculous I know, but my hubby spoils me, what can I say?) that we buy a canvas print everywhere we travel and will grow a collage out of it. So far we have two prints from Paris, one from St. Martin, and one from Dominican Republic (both stops on our honeymoon). Can’t wait to add another!

So what is missing from the room?


Nothing, it is amazing! Almost…we are still in search of a desk chair. It might be a little awkward to work at the desk without one. I have what I want in mind, I’m just waiting to find it for the right price!

We also have another table to go on that empty wall over there on the left.


Shortly after the side table snag, we also nabbed this cool table from the side of the road. I've started to revamp it, but it’s still in the middle of the process so we will have to imagine him filling his space for now. The plan is to put him back in that exact spot.


If it would stop raining every time I go outside to work on it maybe it would be done by now. True story.

With the sunroom complete the house feels so much bigger. It is the first portion of the extra space in our new house that we can actually use. We have already enjoyed some weekend cappuccinos out there and done some trip planning ;-)

Getting this space organized has also inspired us to tackle the other two rooms that are drowning in a sea of nothingness. On to the next!