Thursday, April 23, 2015

Cheers! We Went to London

Hey folks! So I mentioned that our office progress was slowed a bit...because we took a trip to London!!  


We did not have this planned at all. But about a month and a half before we left, The Engineer found his job taking him to Kazakhstan and we decided to piggy back a...holiday as they say in London...off of this. We searched to find a location we could both get to cost effectively. 

London won!


Thus I give you a mostly photo tour of our impromptu trip to London. 

We stayed in an awesome apartment on the river. 


I tried really hard to schedule tea time with the Queen, but she was busy...we did stop by her residence...


Windsor castle.


Interesting fact about the castle, it is right on the flight path to London's biggest airport so you can fly directly over it. Kinda different from the White House here haha. 


We visited the famous Stonehenge.


It was a very cold and windy day. 


Big Ben greeted us several times during our visit. 


And right behind Big Ben on the other side of the river is The London Eye. 


We had a lovely view of The Shard (London's tallest building) and The London Eye from our apartment.


Obligatory red phone booth pictures:


We had no idea when we stopped by Buckingham Palace that the Prime Minister was starting his political campaign: hence the big crowd, news trucks, and marching guards. 


North of London is the Olympic Park from 2012. I thought it was really cool to see in person. We went up the Arcelormittal Orbit Sculpture there and got a great bird's eye view of the Olympic stadium.  They are working hard to convert into the new home of their football team (not American football people..I'm talking soccer here).


Oh, and of course the pool! 


Michael Phelps swam here people. Oh yes, he did. 

We visited the Prime Meridian...the museum was situated on a hill behind this park. 


It was pretty clear the morning we went and our first glimpse of blue sky on the trip! (Hard to get around London)


Form there we took a ferry ride on the Thames River. We passed our apartment building (tall red one in the middle).


And we rode under the Tower Bridge.


Inside the bridge they have newly installed glass floors which are pretty freaky. 


Yes, the river water is pretty much light chocolate milk. 

We also visited the Crown Jewels, but you can't take pictures inside. We settled on pictures of The Engineer with a guard. *snicker* 


As we were leaving the Tower Bridge area we noticed that  the sky was completely blue


Pretty rare moment because I only took the below picture an hour later haha.


Later that day we found ourselves back by the London Eye and the sky was blue again!


And we had a very pretty sunset. 


Another day we rented some bikes and rode around Hyde Park. 


Which is where Kensington Palace is (that's the official residence of the Duke and Duchess of Cambridge, or as you might recognize them Prince William and Kate).


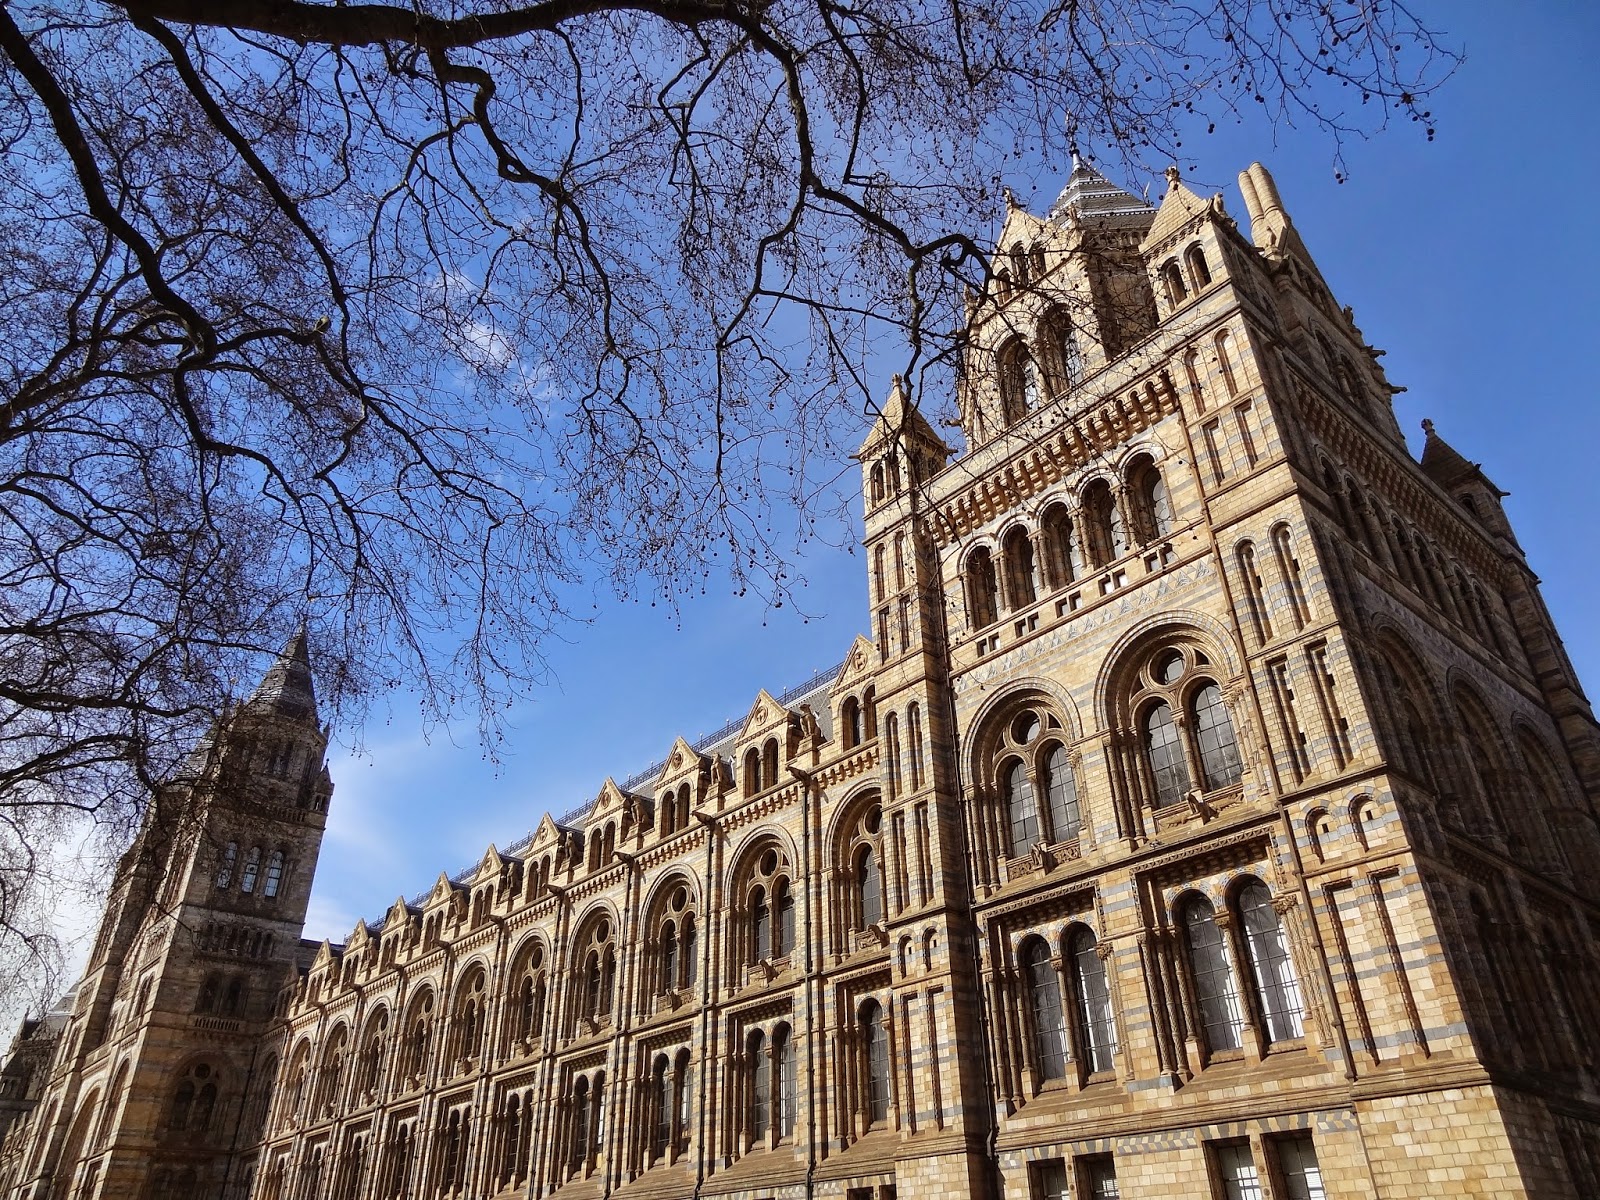
We headed over to the National History Museum. The building was super cool, and it was free (like many museums there are).


The unfortunate part was that it was absolutely packed so we didn't spend a ton of time there. 


The rest of our afternoon was spent back in Hyde Park at Princess Diana's Memorial Fountain. 

\

It is really peaceful and people are encouraged to put their feet in the water. Since it was chilly (warm enough to take our coats off though) we opted for snacks instead. 


We stopped by the Westminster Abby. Many monarchs are buried here, coronations take place here, and so do royal weddings!


One evening we snapped some night photos of Big Ben and the London Eye. 


On our last full day we went on a food crawl and started at Borough Market.


There was this cool coffee shop that was packed every time we passed so we had to get our coffee there. 


Yum!


During the day we also ran across Platform 9 3/4 and the Millennium Pedestrian bridge.


It was nice to chill at one location for the entire trip (unlike our last trip...New York, Milan, Rome, Prague, Amsterdam, and Japan). Both were awesome though!!


Check back soon for more office updates, it is looking so good in there!

Monday, April 13, 2015

The BAR Sign

Really though, we hung a BAR sign. I mentioned how slow I tend to decorate because I don't like to impulse buy items. I'm so glad because I love how the bar is coming along (if you missed the building of the dry bar check it out herehere, and here).

Progress on the office has been non existent since we returned from London (recap post coming soon!). We need to cut the counter tops but haven't had enough time to dedicate to the task yet. We've been busy or sleeping (I'm still maintaining London time ;-)). 

That is OK though because there are plenty of little things around the house that are easy to do. Like hanging a bar sign!


Neat right? 

I found these metal letters at Michael's for 50% off and with a coupon they were $2 each. I'm all for DIY and I'm sure I could have made letters...but for that price I'm totally OK with store bought!

The Engineer was on board when I showed him the letters and he even had a this cool idea to 'float' the letters from the wall a bit because the shadows gave it some nice depth. I loved the idea and we decided to use some nuts as spacers (they were the same color/finish as the nails and letters and kept with the rustic look). 


I measured my wall space and started in the middle and using a level to mark the locations of all six nails. I know I spent an excessive amount of time on this step, but now its all level and spaced perfectly :)


As soon as I hung the first letter I kind of realized that we didn't need the spacers haha!


I didn't hammer the nails all the way in and the letter nicely rested right out on the end of the nail! I was worried that vibrations from doors closing and whatnot might cause the letters to slip backwards toward the wall over time, but so far they haven't moved at all. 

With the nail holes premarked, hanging the other two letters probably took less than one minute. Now for $6 we have some original wall art for the bar which clearly defines its purpose :)


Fun Fact:

The pictures are all taken from an angle because just off camera lies a massive pile of junk from the office renovation which I was climbing all over and through to take these pictures. (Home improvement takes over your home but its always worth it!)

Hope everyone has a great week!

Thursday, April 9, 2015

Thank goodness we live close (to Ikea)!

Hey guys! Hope April is treating you well :) I am back with more progress on the office! We took a tiny break because...

The Engineer and I went to London!


This trip wasn't planned super far in advance...we just took advantage of an opportunity :) I'll definitely put together a post about our adventures! We had a blast!

But back to reality...we have made some more progress with the office.

We painted the office a nice light grey with a dark accent wall where we are planning to build open shelving.


As great as the new paint looked, we couldn't go any farther without our cabinets. We had two hours on a Saturday night before Ikea closed. They don't open until 11 am on Sundays so we wouldn't be able to start work first thing in the morning if we didn't get to Ikea and pick up our materials. We were confident in our design so we went for it.

Placing our order was easy because we already had everything in the Ikea kitchen planner (same thing we used to plan our dry bar here). We just quickly confirmed that the door styles, finishes, and counter tops were the ones we wanted and ordered!

On big orders like this, Ikea pulls your items for you so you just have to kill some time and then roll on out of there with your goods! I only bought a few extra goodies in my spare time :) :) Hey, at least it was all for the office right?


We certainly pushed the limits of our jeep on this load...we had 900 lbs of materials, plus the two of us! Thank goodness we live close to Ikea!!!


Since many areas of the house were housing all the clutter from the office, the only place to offload all this stuff was our living room. So we backed up on the front lawn right to the front door. Classy eh?


Empty above...
And not so empty below...


The Engineer started building the bases for the cabinets on Sunday morning while I put the second coat of paint on the accent wall. 


Once I was finished I helped him build the rest of the cabinet bases.


Ikea assembly is pretty user friendly if you follow their directions. We use their stuff so much that we tend to notice small improvements they make with their products every time we build something. Not sure if that is good or bad haha!

After building all the bases, we took them into the room and set them up as planned to see how it looked. 


Lovin' it!

We did notice one problem though...

Our plug on the far wall was split by the edge of the cabinet.


We knew it would be close and had loosely planned on moving the outlet. But after some discussion, we decided to exchange our 21" cabinet for a 24" cabinet. Those extra three inches put the plug completely behind the cabinet and we just cut a hole for it and plan to put a printer in there.

The cabinets attach to the wall through a railing mounted in the studs. We mounted said railing, put feet on the cabinets and mounted them to the rail. We also cut a hole in the cabinet for the outlet. Unfortunately, I don't have any pictures of these steps because I deleted them. Whoops. I cleared the memory card from the camera before our London trip not realizing that I hadn't downloaded everything from it. Oh well. If you are interested in the process you can check out this post from our dry bar assembly. We used Ikea kitchen products here so its all more or less the same :)

The doors and drawers went on next which made things look a little more like an office for the first time.


And then we high tailed it for London. But we're back on track and will keep the updates coming.

Find previous office progress here and here.

Cheers!

Wednesday, April 1, 2015

A pleasent yet affordable bathroom shelf upgrade

Hello everyone! Did you love March as much as I did? The weather has been BEAUTIFUL!!! I suppose if you are up north you might not agree with me, but these Florida evenings have stolen my heart. The only thing I love more than having my windows open is dreaming about having all of them open once we get the rest of our screens on!! Maybe next year right?

Back to business...I had some time the other night to tackle a minor project to make our bathroom closet a little more palatable. We use our main bathroom for everything except showering, but there are no drawers. Ergo, everything is stored in the closet that I would otherwise consider a linen closet. Since it does not serve that purpose, we have made a few adaptations.

When we moved in, I organized it by like items. For example, my toothbrush and toothpaste were on the same shelf as The Engineer's. This, however, drove me crazy. Primarily because The Engineer has an electric toothbrush that I kept knocking over. I then decided to re-arrange and give each of us our own shelf and store less used items behind our every day items. This became a problem because I put our medicine box in the back and every time we needed a band aid, it was not very accessible. Every time we needed something or tried to put it back it was a hassle and it got messy. Since we were due for another re-arrange, I wanted to do something about our shelves.


The shelves are 'white' wood, but they are old and have many years of life ground into them. Sanding them and putting a simple coat of white would have solved the problem but I really wanted something a little prettier. I had planned to paint a black and white chevron pattern on them but hadn't yet gotten around to it. Turns out I didn't need to. I was perusing TJ Maxx for some office decor and something jumped out at me. (No, the office is no where near done but you can't blame me for getting a jump on decorating! You can check out the progress here and here.)


Contact paper in one of my favorite patterns...two rolls for $7. This was way better than painting. I hope that someday we completely demo this bathroom and start from scratch, but that is a long, long, long way off, so a little pick me up was just what it needed.

I cleared one shelf off at a time and gave it a good cleaning.


Then I rolled my contact paper on the shelf wrong-side-up and marked the back where I needed to cut. 


I lucked out because the roll was the same width as my shelves. Amazing. When I marked my paper I left enough room to wrap around the front so the white would be covered...after all, isn't the front of the shelf the one spot you look at the most?

Once I had my paper cut I rolled it and peeled the backing off the first few inches. I started at the front because that was the most important place to make sure everything was lined up and straight!


Then I just worked my back and made sure I had no bubbles.


With one shelf done, I was so happy with the improvement!


I was also really happy I thought to wrap the paper around the front of the shelf, it gives a nice little detail.


The rest was a simple rinse and repeat. 


I love this improvement! Everything was great except when I looked up at the top shelf. 


See, I hadn't planned on doing the top shelf because you couldn't see the top of it. Buutt when I had the brilliant idea to wrap the paper around the front of the shelf (really, it was a good idea, I'm very happy I did that) it meant that I would have to do the top shelf to calm my OCD. So I got on the step stool and did that one too. 


All better <3

This only took me about 30 minutes, and that included re-organization and cleaning time, so it was definitely a simple, cheap, and pleasant upgrade.