Monday, June 30, 2014

Happy Accidents

Happy Monday! Hope you have a short week to celebrate the 4th! We do and we and calling it a work weekend *muahaha* …we’re coming for you unfinished projects J

Last week we buckled down and kept up with workouts and finished one of our looming projects. Woot woot! The Engineer fixed the leak in the crawl space and built a semi-permanent hatch for the hole (in case we ever need to get down there again) and we got to work on our free vinyl tiles. And please excuse the poor lighting...it's all I had!


Isn't he impressive?

Sadly  I don’t have any legitimate before pictures, but on the bottom of the above pictures you can see the lovely linoleum we had in the laundry closet pre-demolition. Not gunna lie…not my favorite J
The Engineer scrapped glue and sanded the plywood sub floor to get it smooth for the tiles. After a quick cleaning it was ready for some new floors.


We got super lucky because the closet was exactly 5 tiles across. The only cuts we had to make were for the front two corners and the back row…because out closet is not a 5x5 square haha! The vinyl stick on tiles were very easy to install. We did all our cuts with a straight edge and utility knife. The most tedious part was peeling the backing off. Sometimes you had to be extra patient because it would tear and get a little ornery on you. Other than that, it was exactly as you would expect it to be…peel and stick.


We took two nights to do it only because the first night The Engineer was finishing the hatch and spent a decent of time prepping the sub floor. The tile job itself was fast so if that was our only task in an evening we could have easily knocked it out in one night. Since it wasn’t…we put the rest of the tiles down on the second night and pushed the washer and dryer back in (and thank goodness for that because I have never had such a big pile of laundry…I honestly don’t know how we’ve been making it to work fully clothed. TMI?).


Small things can make a big difference. All this because we tore up the floor for another project that went a different direction (the water softener that we are installing on the other side of the house). We now have a patched leak and new floor!


Yes, the washing machine is running, and working overtime!

Tuesday, June 24, 2014

A little of this and a little of that…

It has been pretty busy around here, yet nothing seems to have been completed. Yikes! We have spent a lot of time in the last few weeks doing things other than working on the house. That’s a good thing, but it only leaves small windows to make progress on a project. And by ‘a project’ I mean approximately seven.

No, really.

We are in one of those vicious cycles where you keep starting stuff and never finishing the old stuff :-/

Let’s run through said projects shall we?

Shop:
We found carpenter ants in the shop while The Engineer was working on the well pump. You see, we have a well that we want to use for irrigation and The Engineer was working on it and needed some electrical juice. So we took some of the outlets off in the shop to borrow power while we were testing the pump and low and behold there was a carpenter and nest back there. Needless to say, extermination shot to the top of the list. We emptied the entire shop and pulled off some wall boards and part of the floor to see if we could get all the nest areas. We knew we wouldn't get all of them so we bombed the shop. Twice. No mercy over here. We then reloaded the shop and organized it while doing so. It is so. much. better. Now we don’t have carpenter ants crawling all over the shop. Who would have thought? I think this one of the only projects as of late that we've actually completed. Heh…

Irrigation Pump:
If you didn't guess, The Engineer has been working on the irrigation pump. It has been a bit of a pain and since we suspended work for the shop project it has been on hold. We’ll get back to it soon though.


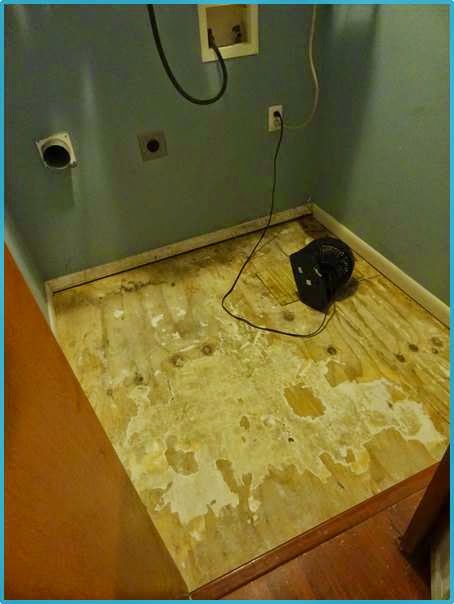
It looks absolutely awful now, but someday I will look back at this picture and remember how far it has come. Until then...I try not to look that way. 

Table Upcycle:
Do you remember this guy (the second table in the post)? I started working on it a while ago but it also stalled when the shop took all our attention. It is coming along nicely and I have most of the parts I need to put it together. I just need to finish sanding it and start the finishing work. I’ll put a post together when I get the table together…whenever that is. Not on the top of the list at the moment.

Built-in Shelf:
We wanted a built in shelf in our bedroom by the door. We bought said shelf (aka bare wood plank) and brackets and needed to stain the shelf. I used some left over stain we had and once I finished the first coat we realized it was way too red for us. 


So I sanded that all off one day when I had the sander out for the table. It’s basically back to square one. I need some creative inspiration to finish that.

Water Softener:
We’re installing a water softener because our water is as hard as steel. But really, it’s pretty rough. We were going to install it outside and put it in a little shelter but we just felt that it would last longer inside. The plan was to pull the washer and dryer out a little bit and sneak it in behind them in the laundry closet. We then realized that the water comes into the complete opposite side of the house meaning a huge cost in pipes to get all the way over there. We are now debating putting it in the closet in our guest room and building a little closet inside a closet for it.

Anyway, before we decided to switch that we ripped up the floor in the laundry room and cut a hole to get access to the crawl space below to tie the piping for the water softener in. No worries though, we actually needed to get down there anyway to repair a leak. So we didn't rip that all up for nothing. And by we I mean The Engineer. J

Leak Repair:
Sooo The Engineer got in the ridiculously small space under the laundry room and fixed our leak. That is actually done now. Woot!! He worked on ripping up the rest of the linoleum (couldn't be happier about that), sanding the floor, and semi-permanently patching the hole last night and should finish today.

Re-flooring the Laundry Room:
Since we ripped up the floor in the laundry room, we need a new one! I wanted those simple vinyl stick-on tiles since it’s just a closet and with the washer and dryer in there you only see a 1-foot strip of floor in the front. I just didn't see the need to spend more money on it. We got super lucky when a neighbor was cleaning out their garage and had 4 boxes of those vinyl stick-on tiles that they didn't want anymore! Free = wonderful! We have it on the books to get the tile down this week and put the laundry room back together. Which is much needed because we have a growing mountain of laundry.

Painting the Sunroom:
The sunroom has yet to be anything other than a storage room. I got some items for it for my birthday; a rug, desk, and cute little lamp that The Engineer arranged oh so cutely for me...


And we finally bought a love seat for the room. 

The main hold off was/is the wall. Most of the room consists of beautiful floor to ceiling windows. The back of the room, however, is plybead plywood panel that is plain wood. And I don’t like it. 


It is the same stuff that was in our front entry that I painted white and now love. 


I’m doing the exact same thing in the sunroom and can’t wait to see how the white will pop against the brick floor. I finished priming it last night so now it needs two coats of paint and we can set up the sun room!!! Can. Not. Wait!!! Post on that before and after coming sometime after that room is finished.

Fixing the Shed:
Somewhere in the middle of all this we did some work to the shed. The Engineer started cleaning the roof, which desperately needed it and was all too noticeable after we trimmed the trees above it. He realized that the trim was actually hollow and was housing a bit of…organic matter. As in 10 years’ worth of leaves, dirt, bugs, mud…you name it, it was in there. On that particular day I recall that I was doing the trim work in the sunroom and when I realized the magnitude of the problem with the shed, I abandoned it to help The Engineer tackle it. We took all the trim off and I was happily battling carpenter ants as we did. We were deep cleaning everything as we went and it got a bit late. As we were cleaning up I found the mecca of the carpenter and nest and terminated it. J It’s the small victories. Anyway, we haven’t gotten back to the shed yet. We need to finish cleaning the trim and put it back on. We are then going to clear out the entire shed and bomb it for bugs, maybe twice for good measure. Before we load it back up, we are going to move it. That’s right I said we are moving it. It sits a good 8 feet from the fence and there is no reason for that. It is just wasted space back there. So we want to put it maybe 2 feet from the fence so we just have a little access walkway and gain some 6 feet of yard out of it. It seems like a small thing for such a task, but we both believe it will be worth it. One more thing on the list :)

Table Build:
When we were cleaning out the shop we found a small counter top. Just the top. I want to build a base for it so it can be used. This isn't something I've started so it’s not fair to include it on the ongoing project list, but it is on my mind.

So in case you lost count, excluding the last table mentioned, that is actually 9 projects in the works…two of which that are actually finished. Don’t worry, we've set aside some time in the coming weeks to get some of this stuff wrapped up.


That’s what’s been going on over here, any lingering projects in your house?

Tuesday, May 27, 2014

So we may be hoarding

And if we aren't hoarding we certainly are collecting some...stuff. We moved from a 2 bed/2 bath apartment to a 3 bed/2 bath house. While the third bedroom isn't that much extra space, we also gained a sun room and another random room we refer to as the sitting room. That’s three entire rooms that we don't have any furniture for and lately we've had an eye out for treasures on the side of the road.

The Engineer brought home this table that he thought would make a great little end table for the love seat in the sun room that we have been searching for (in stores for the love seat, not the side of the road!). I think he was right though! With a $0.00 price tag, I spruced this right up with minimal effort. :-D


I let ideas brew for a few days. The only part that was in rough shape was the top surface; it had just been worn over time. Which is why, I’m sure, it came complete with a place mat…which I promptly discarded. I knew all it needed was a few coats of paint on the top and it would be good to go! Well, and a good cleaning. You never know ;-)


I chose white to lighten it up a bit and because I knew it would tie into the sun room well once it was finished. I simply free handed around the edged with a small stiff brush and went to town on the middle with a larger angled brush.

Two coats would have done it on the middle, but I was doing a much thinner layer on the outside with cutting in the edge so that took three coats. Since I wasn't in a rush (after all, there isn't anything else in the sun room haha!) I let it dry overnight in between each coat.

A few days after I started I was finished and for $0.00 (since we already had the white paint) I have a sweet new end table for the love seat when we get one!


Our more recent side of the road snag was literally from right down the street and it was a bit of a fiasco, in a funny way though. I’m actually really sad there is no video evidence of it. I saw it on the way home and literally did a second drive by! I felt a little weird picking it up because even though an abandoned piece of furniture by the road is the universal sign for "free, please take me" I needed some backup. I called The Engineer and told him to look for it on his way home, and if he liked it and if it was still there than it was mean to be. Well he had the same response I did when he got home so we figured we could tackle this as a team. I'm making this whole thing sound like a big deal, it wasn't. The 'piece' was a table of sorts, about 3 feet tall, 2.5 feet long, and 1 foot wide. It had one small drawer at the top and two open selves for storing wine.


Regardless, we both hopped in the truck and headed down the street. The Engineer was driving so I was to be the heist-er and since I was in the passenger seat and he was the getaway driver. We pulled up to it and I jumped out expecting to pick it up, throw it in the truck bed, and be back in the cab in a few seconds. That did not happen. I had grabbed it by the table top unaware that it wasn't attached! So when I lifted it all crashed to the ground. I considered aborting but I held strong so I dropped to the ground to grab the bottom of the table, which The Engineer found hysterical since from his view I had dropped everything and then just disappeared! I threw the bottom in the back of the truck and grabbed the top and barely got myself back in the truck, table top and all. I was laughing so hard that I couldn't even tell The Engineer to go, and he was just dumbfounded at my epic failure. It was highly amusing, I’m sure even more so if you were watching. We were both crying from laughing so hard. At the end of it all though, we have another piece for me to tackle. This one is cool too because it is very well constructed. After reattaching the top and giving it a face lift it will be awesome. I’m not sure what I’m going to do to it yet mostly because I haven’t fully decided exactly where to put it. There are a few options for it around the house. In the meantime I will be brainstorming, I already have some thoughts!


Tuesday, May 20, 2014

Seal That Deck

Since we started working on the yard, we can't really keep our hands off it. Ahem, exhibit A and exhibit B. We are really starting to love the yard now that its had some TLC. It has a long way to go still, but it is closer. One area that really needed attention was our deck.

\

I love this deck! Buuttt the wood was rather weathered and we wanted it to last as long as possible so we decided we should clean it and reseal it. BEHR all-in-one wood cleaner and semi-transparent weather proofing all-in-one wood stain and sealer were our products of choice, mostly because of comfort level with the brand name.


We followed the instructions on the bottle and wet the deck, sprayed the diluted mixture on, scrubbed after 15 minutes of sitting time, and rinsed. 


Now the all-in-one cleaner claims pretty intense results with its before and after pictures, but I was not a believer. Granted, I knew the cleaning of our deck wouldn't be that dramatic since we didn't have stain or paint we were stripping off, but still, I didn't think I would even notice a difference. Admittedly, I was wrong. I could definitely tell that it did its job. 


The next morning I started staining the railings. Thaaattt took a little while. I did the first layer solo and it took about 4 hours :-/ I used a sponge with little soft bristles to apply and it worked really well. The difference between the railing and the untouched deck were already obvious after the first coat and became more defined after the second coat. Thankfully The Engineer helped the second time around. and it only took us about 2 hours. 


Once the railings were finally done we tackled the deck with a sponge type applicator on an extended pole. 


It already felt like a new deck after one coat! Unfortunately our little whim of a project turned into an all day deal. After a dinner break we came back for round two (1-2 hours of dry time was recommended between coats), mosquitoes and all. 


The rest of the night we kept looking out the window and saying, "Woah, look at our new deck!" It is a good feeling to know that we did out part to keep it lookin' good. 

A few days later when I went outside to take some after pictures I was greeted with this.....


WHAT!? Right after we rented the man lift and trimmed all our trees! We hadn't trimmed this one because it didn't really need it (or so we thought) and knew we could get some of the small stuff later if we wanted. Turns out that last time this tree was cut it wasn't cut properly and the stub rotted back and through this perfectly healthy limb. :( Luckly no one was out there when it came down and it didn't damage anything. We are sad though because that limb gave the best shade. 

Back to those after pictures though. 


And the view without that shady limb.


It was a great one day investment because it makes the deck look so much better. I don't feel like it is going to fall apart anymore and now its protected and will live a much longer happier life :)


Tuesday, April 15, 2014

Tree Trimmin

So many things to do, so little time...

Our trees needed trimming. Bad. 


Maybe it doesn't look so bad to you but we had a few problems with the situation. The limbs over the driveway were pretty low. Our moving truck didn't even have a foot to spare when we moved in. The limbs over the house were also very low. In various areas limbs had been trimmed, but they weren't taken all the way back to the branch collar (the spot where the branch splits from its parent branch or the trunk), leaving us with rotted stubs. Finally, the right side of the front and side was so overgrown that it was like a dark little forest cave. In the back we had similar low limb problems over the shop and shed.


It was just bad news bears to have that many low limbs over the house and sheds with all the hurricanes we have around here. We knew this would be a big job but we were up for the task. With three large oak trees, tall palm trees, and a few other miscellaneous trees up high in the sky, we decided that renting a man lift was the way to go. I'll tell you up front...totally worth the money!!!


We hit a good rhythm with the front oak and were getting things done just as planned. We only ran into one minor whoops. The limb over the driveway was by far the biggest limb we took down.We went along in sections so we didn't kill our driveway, made sure the lift was properly positioned, and were using ropes to direct falls. Unfortunately, we had a 'flop' as I like to call it. This huge piece hit the ground just fine and flopped toward the driveway. That was all well and good, but it was a few inches to long and caught the edge of the driveway and smooshed a bit of the concrete.  


Didn't see it? Yeaaahhh, its only about two inches, but it made me so sad because we were on track for a perfect record! Trust me, I'm beyond thankful that we got the job done safely and that no one got hurt :)


I suppose we had another casualty because if you glance at the background of the picture up there with the large limbs in it, you will notice that the big one in the back crushed some of our plants in front of the oak. Oops, they will bounce back!

We completely finished the front yard on day one!


Epic difference! And yes, I just said that. And no, our tree isn't dead. It is just the last oak tree to the 'lets drop all of our leaves and grow new leaves' party. Its just now sprouting new leaves while our neighbors trees are full and lush. Slow and steady, buddy, slow and steady. 

We tackled the back yard on day two and it also went really well. Some highlights: 

The Engineer stretching the legs of the lift and trimming above our beloved light post. What are the chances we can get that removed? One of the oddities of our home haha!


The before and after of the shop:


This one is a little difficult to tell because of the rough lighting in the before picture. If you remember from this post The Engineer had already trimmed a few low branches the day we worked on that corner of the yard. 

The before and after of the shed:


The area above the shed opened up very nicely, much better than the pictures portray. We also removed that bush tree thing to the left of the shed. It was a mean thorn infested plant covered in a thorn infested vine. Seriously. It looks and feels so much better now. 

The removal of the dead tree trunk:


The awesome mulch pile that is now where that trunk used to be:


The next weekend we rented a wood chipper because we had SO much on the ground. 


So so much, the pile practically covered the backyard. It was worth it though to get the chipper to not only get rid of all our branches and small limbs but now we don't have to buy mulch when we get around to out bed areas. Win! 

Trimming the trees made such a big difference and it was a big item to check off the list. I'm so glad we got it done before the hot summer months and before the hurricanes rolled. in. We are starting to love our yard now. We really can't wait until we get sod in. :) 

Friday, April 11, 2014

Cabinet Upcycle!

On New Year’s Day this year (before we moved out of the apartment and into the house) I told The Engineer I wanted to do something productive and fun and I suggested that we redo this cabinet (it also has a matching armoire that we will do something with in the future). 


We figured we were going to put this piece in the dining room and use it to nicely store/display some overflow kitchen items. We wanted to roughly match the paint color to the kitchen island and cut the inlays out of the doors and replace with glass inlays. Thus, we made a plan.

To Do:
1   1.  Remove inlay from doors.
2   2. Strip stain from top.
3   3. Sand remainder of cabinet.
4   4. Cut quarter round to frame the windows in the doors and install.
5   5. Cut thin piece of backing to cover side inlays and install.
6   6. Prime/paint cabinet (excluding top, which will be stained).
7   7. Cut and install Plexiglas in the inlays of doors.
8   8. Spray paint hardware.
9   9. Stain top.
    10.  Seal.

The demo was pretty hysterical. The Engineer got a Sawzall for his birthday and that was our tool of choice to cut out the door inlays…in the kitchen. Yup. We’re pretty excited to have an actual shop at the house and to feel justified in buying the tools we need. Back at the apartment we just didn't have the space for that kind of stuff. 


Cutting the inlays out was easy and straight forward but since they were literal inlays we then pulled the remaining part of the inlay out of the slot it was nested into with plyers.

We bought a cheap sheet of backing from Home Depot and had them cut it to the size we needed for the side inlays. We felt no need to remove the original inlay which made this step a little easier. The piece we found was in the scrap bin and was about 1/8" thick. Since the pieces were already cit to size it just took a little sanding to get them to fit in snugly. We secured them with wood glue and a few brad nails. It was at this point that we realized we liked the color contrast and opted to buy two blue colors instead of just one. 


We bought quarter round for the doors and in addition, a miter box since we don’t have a miter saw and weren't ready to make that investment. The Engineer cut the quarter round at 45 degree angles at the corners and made sure they fit will in the doors.  We just used wood glue to attach the quarter round since they were wedged in the doors tightly. Since we didn't own enough clamps to hold all the pieces down, we got creative and tied them with left over string from the wedding. We have more clamps now :)

At this point everything was ready for sanding and painting. We tested sanding the top by hand and knew immediately that we would be investing in an electric sander. We decided on the Ryobi electric pad sander and it. is. awesome. It feels like we already got our money out of it on this project and have used it for more! Needless to say, that made sanding the top a breeze. The next morning I sanded the remainder of the cabinet, with the electric sander where I could and by hand everywhere else (on the balcony and not in the kitchen this time!) and gave it a good wipe down before I primed it. It took me a good 1.5 hours to prime everything by myself while The Engineer was at his flight lesson.  I know that sounds like a lot but there were a lot of little nooks to get into!


When he got back we both started painting the cabinet. We had decided on the Behr color Coastal Mist to paint the entire cabinet with, but after seeing the lighter inlay on the side the previous night we opted for two colors, which was a great audible. We matched the darker blue to the blue on the new kitchen island (as best as we could from pictures). We knew it won’t be perfect, but it doesn't have to be. They aren't right next to each other but when you have them both in your view you see some continuity. We also pulled another audible when we were purchasing the second paint color and decided to stain the top light to match the kitchen island as opposed to dark to match the kitchen table as originally planned. We had really started to enjoy the natural wood on there, so we kept it!

Painting was straight forward, I just had to go back and do some touch up where the painters tape failed us. 


We glued the Plexiglas (after cutting it to size via scoring and snapping method) to the back side of the quarter round and were pretty excited with how well it turned out. I then went overboard taping the hardware for the spray paint but I was terrified of getting any over-spray on the newly installed Plexiglas. 


We stained the top with our natural stain and sealed it after we moved to the new house.

We are really happy with how it turned out and I love love love the way it looks in the new dining room!!!


The two colors make the inlay cover up on the side look more intentional and the windows in the doors let me display pretty serving items from the kitchen while storing them at the same time which is a double win with the limited kitchen storage here. 

In case you forgot where we started...


I'm excited to re-purpose the matching armoire!