Monday, July 14, 2014

The Ball is Rolling

Part I: Dry Bar Installation (Part II and Part III)

Since we put the sunroom together we have been itching to get the other two ‘extra rooms’ to a functional state. We have the entry room/sitting room/wedontknowwhatthehecktocallit room and the office to work on. We have plans for both rooms but got really invested in the entry room since it is the connector between the sunroom and the rest of the house…ahem…and the entry to our home! We decided to ignore the office right now because it can hide behind closed doors.  

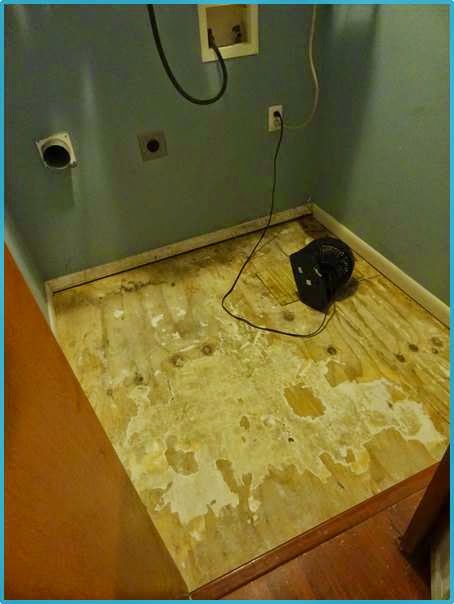
The entry room is…interesting. Our home was originally built in the 1950s as a 2/1. The entry room is the first room of the add-on portion of the house. It connects the original house via the kitchen to the added bedroom (aka the office) and the sunroom. And if you didn't catch on, it also has a second entry door. It is closer to the driveway so we use this door 99.9% of the time. Were you keeping track of the doors? There were 4. Four different doors on four different walls.

The entrance is a regular door.


The office has a set of French doors (that desperately need to be repainted, but that’s a job for another day).


There is a smaller set of French doors to the sunroom.


Finally, there is a large doorway through to the kitchen which has a vintage elevator door from a cigar factory in Ybor that is on a sliding track (and yes, it is as awesome as it sounds).


So, like I said, there are four different doors on each of the four walls, making this an interesting space to work with. Oh, and there is also a beam running through the middle of the ceiling…which happens to be two different heights.

Now something I consider lucky is that we need extra kitchen storage. We actually don’t have that much cabinet space even though the kitchen feels pretty spacious.


We defaulted to the exact same method of additional storage that the previous owners did which was to place an armoire on the only open wall in the entry room and fill it with the kitchen items that didn't fit in the kitchen.


So why do I consider it lucky that we needed extra kitchen storage? Well, without that need, I don’t know what the heck we would have decided to do with this space. At least needing some additional kitchen storage gave us a direction to go with the room. With that in mind, we came up with the idea of creating a dry bar. Do you hear the angels rejoicing like I do?

A dry bar would give us the kitchen storage we needed in the form of lower cabinets. Then everything above and visible would be a cool place for all our wine and beer J We were loving the idea and couldn't wait to get into this project since day one in the house because let’s face it, one lonely armoire in the entry room of your house that you see every day is so so sad.

We had been coming up with ideas for a while, but nothing too serious. Everything was on the back burner, that is until we finished the sunroom. You have to go through the entry room to get to the sunroom. After the sunroom turned out so awesome, we literally couldn't wait to give some functionality to the entry room. We spent the second half of our Saturday designing the dry bar. We were using IKEA’s online home planner (in case you are interested). It is a pretty good tool for visualization and spacing if you are using their products. We went through several iterations before we arrived at the final plan.

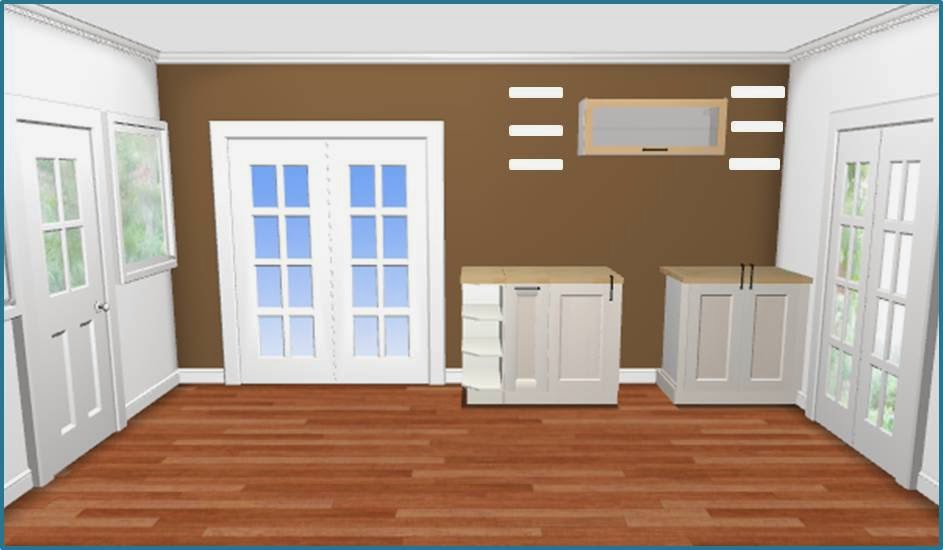
Originally we planned to have a tall pantry like cabinet on the left (primarily for that kitchen storage we needed) and a dry bar area with lower and upper cabinets on the right.


{Side note, all these plans are simply screen shots from the IKEA home planner. Also, our walls are a very light green (not lime green) and the white cabinets weren't showing up too well against them in the program, so as we move through the pictures you will also notice the evolution of the room in the background haha.} 

This was the plan from day one and for a long time after because we weren't really brainstorming that much about it. One alteration we did have to that was a ‘minimalist’ plan where we would use one of those pre-made kitchen islands or bar on wheel get-ups with some type of upper cabinet of the wall.


There were several problems with this plan. Although we could find plenty of options for the lower portion, there weren't a lot of budget friendly options (after all, the idea of a minimalist setup should include some dollar savings right?).  Another problem with this option was that the storage it was adding was open shelf storage and we were honestly trying to hide the rest of the kitchen stuff, not display it L

We then looked at a more traditional kitchen setup with normal lower cabinets and upper cabinets, jazzing it up with glass inlays in the upper doors.


We tried to make it a little different with the open shelving in the middle of both sets of cabinets.  This option was nicer to us and we liked it, but it just wasn't stealing our hearts. It just looked so heavy. 

It was at this point that we had one of our revelations. We didn't want this to be an awkward detached extension of the kitchen; we wanted it to be ‘cool’ and able to stand on its own. This was why we tried the open shelving out and they did add a little something. In reality though, what the heck was I going to do with a bunch of little 9 in by 5 in shelves? Nothing. I would struggle to fill those with stuff I don’t have and don’t need to buy. So we took them out and thought, “what if we could buy a wine cooler for a price similar to those shelves?”

We had looked at built in wine coolers, but they are expensive. The free standing ones are much more affordable, but technically you aren't supposed to build them into your cabinets because they will lose the air flow they need to operate properly. After a quick Google search we were confident that we could DIY building in a free standing wine cooler with enough space around it to maintain the air flow. Then it was on like donkey kong. We started to scour the interwebs for a free standing wine cooler that was equivalent to the cost of the shelves.  We knew once we found the right on that this would be the direction we wanted to head. At this point we removed the shelves from the lower cabinets in the plans and left a gap there where the wine cooler would eventually go.

Now our creative juices were flowing and we were starting to point the design toward awesome dry bar instead of weird kitchen extension. We shrank the upper cabinets and expanded our options up top with open shelving.


Sadly, in the home planner gadget we were using, we couldn't import every single IKEA product, so we had to go with our imagination. So in the above plan the floating shelves are missing. We were leaning toward the IKEA LACK shelves. They are simple floating shelves that come in three sizes (we had to default to the 12” because the other two options were too long for our space). We also planned to build some simple x-box wine storage to go below the two upper cabinets, as rudimentarily demonstrated below along with the floating shelves.


With the floating shelves, we planned to install lighting on the underside since we have that type of lighting in the kitchen and really like how it looks.

We were much happier with this plan, but it still wasn't there yet. I was really into having glass inlays in the upper doors and the smaller cabinets didn't offer this option. We thought about getting them anyway and doing the inlay ourselves, but that seemed counter intuitive to buy something new and immediately tear it apart to redo it. I save that stuff for the pieces I find on the side of the road J

The Engineer then saw a picture where the floating shelves were on the outside of the cabinet instead of the inside. He really liked it and came up with this plan.


It was looking pretty cool, but with the small shelves (3 on each side of the cabinet), and I was worried that they would get lost between the right side of the upper cabinet and the wall…they are only 11” deep. For your viewing pleasure, I again placed a really high tech representation of those shelves below.


I was liking it. Liking it a lot actually, but I wasn't loving it. We still planned to build a little wine storage under the cabinet.


At this point in the evening we went to Home Depot to do some price shopping. While we were looking at and planning with IKEA items, we knew once we got the general plan we could shop around other places to find what we wanted at the price we wanted. Long story short, we decided that IKEA was going to get us where we wanted to go. No complaints from this girl about another weekend trip to IKEA!

On Sunday we were in IKEA’s showroom bouncing back and forth between our plans and the merch. One of the first things we saw was this bad boy. The only difference was that the base of the one we bought was the same birch color that the door is. Apparently this is new so everything isn't updated on the website. 


It was the perfect solution to our upper cabinet problem! See, part of the fear I had with the last plan above was that the cabinet was too large and would overpower the floating shelves instead of creating a nice balance with them. This cabinet was half the size, it had my glass inlay that I just had to have (the double cabinet above only had frosted glass), and as soon as we put it in to the plan we loved it.


Of course, with shelves…


We debated where the top floating shelf should go. It would either be a normal shelf as depicted above, or mounted all the way up on the ceiling as an architectural feature, like below. Spoiler alert, option 2 won out. With the lights installed on the shelves, it looked really cool to have the top one at the ceiling. We didn't make the final call on this though until we actually had the shelves and were holding them up to the wall.


We made some final decisions in IKEA and placed the order.  And had a free lunch while our items were pulled! I guess the free lunch is new at IKEA…if you spend $100 you can take your food receipt when you check out and they will take that amount off your total! I’m not sure if this is a limited time only thing, or specific to our store, but we appreciated it!

We got home and unloaded the car just before the rain hit and got started working…


Stay tuned ;-)

Tuesday, July 8, 2014

WE HAVE A SUNROOM!!!

Are you as excited as I am?!?!

Probably not, but I’m ok with it. The sunroom has been a long time coming for us. The way I’m talking about it makes it sound like we build it on ourselves, but we didn't.  It was already part of the house when we bought it, but it wasn't doing anything more than acting as a storage area for random stuff.


With such beautiful floor to ceiling windows on three sides and a 1924 brick floor, this room was destined to be awesome…just not right away. If you remember, we moved in from a 2/2 apartment to our 3/2 house with a sunroom and entry room. We didn't quite have the furniture to fill the place. No worries, I've been secretly collecting items here and there J

One main item missing from the sunroom was a loveseat. We looked for a while and re-visited most stores until we finally picked this:


Looks comfey huh? Before the couch went into the sunroom it had to be painted, so actually getting the couch in the house inspired us to get the room together.

The back wall is wainscot panel which was just not my favorite as bare wood. Since I loved how the front entry turned out after a coat of white paint, I was excited to do the same for the sunroom wall. I cleared some space to work and gave the walls a once-over to dust/clean them before the primer. I also pulled a good number of nails form the wall and patched holes.


I taped the floor and used an angled brush to do all the trim. I then came back and primed the rest of the wall with my brush. Yup, with my brush. I tried to use a roller when I did the front entry way, but I couldn't quite get all the way into the grooves with the roller. So, for the primer and first coat of paint, I used a brush. Yes, It was time consuming.


The Engineer helped me put the first coat of white on which was a huge relief because it goes so much faster with two people when you aren't using a roller.


I did the edges one last time with the brush and then broke out the roller to get a good even coat. Fifteen minutes for the final coat compared to two or three hours for the previous coats with the brush was awesome! I was also pleased that I only needed one coat with the roller; mostly because that coat took all the white paint I had left! As the final coat of paint dried we cleared everything from the room that wasn’t supposed to stay there and gave the floor a good cleaning before setting everything up.


We started with the rug I got for my birthday (specifically picked out for the sunroom months ago). We thought it might be nice to have a little cushion under it since the brick floor was so uneven. We happened to have this old workout mat that we weren't using and after trimming about a foot off, it was a perfect fit! I’m so glad we did this because it is so much more comfortable to walk on with the extra layer than without!


We unwrapped the couch and brought in and nestled it into its little nook. This is probably the point when I fell in love.


Bringing the rest of the items back into the room was easy and fast. The room has come together so nicely!


To give you a little tour of the goods:

The chest we are using as a coffee table is from The Engineer’s grandmother and we were saving for this exact purpose once we got a loveseat.

The Engineer snagged the side table next to the couch from the side of the road that someone was throwing away. I just cleaned it and gave the surface a fresh coat of paint and we had a new end table for that loveseat too.

While hitting up garage sales one weekend we found that awesome artists easel for $15 and snagged it knowing we would use it in the sunroom to display art. Though, the jury is still out on what piece we will keep up there.

I bought the blue vase by the desk from home goods because I loved it and the little squiggly stick thingys are from Ikea.

The wire bikes were from our bicycle themed wedding and I love having that reminder when I look at them. The empty pots in the wire bikes are from TJ Max and I knew that the color of the flowers combined with the blue vase above would give the room some color splashes (these were some of the original things I had stashed for the sunroom).

For my birthday I asked for a few other items for the sunroom. The desk, rug, and lamp are all from Target and I love all of them. I leaned on white a lot because I knew it would pop off the dark floor very nicely. I also specifically wanted a shaggy rug to provide a contrast to the hard brick floor.

We hung some art on the wall…


We started a tradition when we got engaged in Paris (ridiculous I know, but my hubby spoils me, what can I say?) that we buy a canvas print everywhere we travel and will grow a collage out of it. So far we have two prints from Paris, one from St. Martin, and one from Dominican Republic (both stops on our honeymoon). Can’t wait to add another!

So what is missing from the room?


Nothing, it is amazing! Almost…we are still in search of a desk chair. It might be a little awkward to work at the desk without one. I have what I want in mind, I’m just waiting to find it for the right price!

We also have another table to go on that empty wall over there on the left.


Shortly after the side table snag, we also nabbed this cool table from the side of the road. I've started to revamp it, but it’s still in the middle of the process so we will have to imagine him filling his space for now. The plan is to put him back in that exact spot.


If it would stop raining every time I go outside to work on it maybe it would be done by now. True story.

With the sunroom complete the house feels so much bigger. It is the first portion of the extra space in our new house that we can actually use. We have already enjoyed some weekend cappuccinos out there and done some trip planning ;-)

Getting this space organized has also inspired us to tackle the other two rooms that are drowning in a sea of nothingness. On to the next!


Monday, June 30, 2014

Happy Accidents

Happy Monday! Hope you have a short week to celebrate the 4th! We do and we and calling it a work weekend *muahaha* …we’re coming for you unfinished projects J

Last week we buckled down and kept up with workouts and finished one of our looming projects. Woot woot! The Engineer fixed the leak in the crawl space and built a semi-permanent hatch for the hole (in case we ever need to get down there again) and we got to work on our free vinyl tiles. And please excuse the poor lighting...it's all I had!


Isn't he impressive?

Sadly  I don’t have any legitimate before pictures, but on the bottom of the above pictures you can see the lovely linoleum we had in the laundry closet pre-demolition. Not gunna lie…not my favorite J
The Engineer scrapped glue and sanded the plywood sub floor to get it smooth for the tiles. After a quick cleaning it was ready for some new floors.


We got super lucky because the closet was exactly 5 tiles across. The only cuts we had to make were for the front two corners and the back row…because out closet is not a 5x5 square haha! The vinyl stick on tiles were very easy to install. We did all our cuts with a straight edge and utility knife. The most tedious part was peeling the backing off. Sometimes you had to be extra patient because it would tear and get a little ornery on you. Other than that, it was exactly as you would expect it to be…peel and stick.


We took two nights to do it only because the first night The Engineer was finishing the hatch and spent a decent of time prepping the sub floor. The tile job itself was fast so if that was our only task in an evening we could have easily knocked it out in one night. Since it wasn’t…we put the rest of the tiles down on the second night and pushed the washer and dryer back in (and thank goodness for that because I have never had such a big pile of laundry…I honestly don’t know how we’ve been making it to work fully clothed. TMI?).


Small things can make a big difference. All this because we tore up the floor for another project that went a different direction (the water softener that we are installing on the other side of the house). We now have a patched leak and new floor!


Yes, the washing machine is running, and working overtime!

Tuesday, June 24, 2014

A little of this and a little of that…

It has been pretty busy around here, yet nothing seems to have been completed. Yikes! We have spent a lot of time in the last few weeks doing things other than working on the house. That’s a good thing, but it only leaves small windows to make progress on a project. And by ‘a project’ I mean approximately seven.

No, really.

We are in one of those vicious cycles where you keep starting stuff and never finishing the old stuff :-/

Let’s run through said projects shall we?

Shop:
We found carpenter ants in the shop while The Engineer was working on the well pump. You see, we have a well that we want to use for irrigation and The Engineer was working on it and needed some electrical juice. So we took some of the outlets off in the shop to borrow power while we were testing the pump and low and behold there was a carpenter and nest back there. Needless to say, extermination shot to the top of the list. We emptied the entire shop and pulled off some wall boards and part of the floor to see if we could get all the nest areas. We knew we wouldn't get all of them so we bombed the shop. Twice. No mercy over here. We then reloaded the shop and organized it while doing so. It is so. much. better. Now we don’t have carpenter ants crawling all over the shop. Who would have thought? I think this one of the only projects as of late that we've actually completed. Heh…

Irrigation Pump:
If you didn't guess, The Engineer has been working on the irrigation pump. It has been a bit of a pain and since we suspended work for the shop project it has been on hold. We’ll get back to it soon though.


It looks absolutely awful now, but someday I will look back at this picture and remember how far it has come. Until then...I try not to look that way. 

Table Upcycle:
Do you remember this guy (the second table in the post)? I started working on it a while ago but it also stalled when the shop took all our attention. It is coming along nicely and I have most of the parts I need to put it together. I just need to finish sanding it and start the finishing work. I’ll put a post together when I get the table together…whenever that is. Not on the top of the list at the moment.

Built-in Shelf:
We wanted a built in shelf in our bedroom by the door. We bought said shelf (aka bare wood plank) and brackets and needed to stain the shelf. I used some left over stain we had and once I finished the first coat we realized it was way too red for us. 


So I sanded that all off one day when I had the sander out for the table. It’s basically back to square one. I need some creative inspiration to finish that.

Water Softener:
We’re installing a water softener because our water is as hard as steel. But really, it’s pretty rough. We were going to install it outside and put it in a little shelter but we just felt that it would last longer inside. The plan was to pull the washer and dryer out a little bit and sneak it in behind them in the laundry closet. We then realized that the water comes into the complete opposite side of the house meaning a huge cost in pipes to get all the way over there. We are now debating putting it in the closet in our guest room and building a little closet inside a closet for it.

Anyway, before we decided to switch that we ripped up the floor in the laundry room and cut a hole to get access to the crawl space below to tie the piping for the water softener in. No worries though, we actually needed to get down there anyway to repair a leak. So we didn't rip that all up for nothing. And by we I mean The Engineer. J

Leak Repair:
Sooo The Engineer got in the ridiculously small space under the laundry room and fixed our leak. That is actually done now. Woot!! He worked on ripping up the rest of the linoleum (couldn't be happier about that), sanding the floor, and semi-permanently patching the hole last night and should finish today.

Re-flooring the Laundry Room:
Since we ripped up the floor in the laundry room, we need a new one! I wanted those simple vinyl stick-on tiles since it’s just a closet and with the washer and dryer in there you only see a 1-foot strip of floor in the front. I just didn't see the need to spend more money on it. We got super lucky when a neighbor was cleaning out their garage and had 4 boxes of those vinyl stick-on tiles that they didn't want anymore! Free = wonderful! We have it on the books to get the tile down this week and put the laundry room back together. Which is much needed because we have a growing mountain of laundry.

Painting the Sunroom:
The sunroom has yet to be anything other than a storage room. I got some items for it for my birthday; a rug, desk, and cute little lamp that The Engineer arranged oh so cutely for me...


And we finally bought a love seat for the room. 

The main hold off was/is the wall. Most of the room consists of beautiful floor to ceiling windows. The back of the room, however, is plybead plywood panel that is plain wood. And I don’t like it. 


It is the same stuff that was in our front entry that I painted white and now love. 


I’m doing the exact same thing in the sunroom and can’t wait to see how the white will pop against the brick floor. I finished priming it last night so now it needs two coats of paint and we can set up the sun room!!! Can. Not. Wait!!! Post on that before and after coming sometime after that room is finished.

Fixing the Shed:
Somewhere in the middle of all this we did some work to the shed. The Engineer started cleaning the roof, which desperately needed it and was all too noticeable after we trimmed the trees above it. He realized that the trim was actually hollow and was housing a bit of…organic matter. As in 10 years’ worth of leaves, dirt, bugs, mud…you name it, it was in there. On that particular day I recall that I was doing the trim work in the sunroom and when I realized the magnitude of the problem with the shed, I abandoned it to help The Engineer tackle it. We took all the trim off and I was happily battling carpenter ants as we did. We were deep cleaning everything as we went and it got a bit late. As we were cleaning up I found the mecca of the carpenter and nest and terminated it. J It’s the small victories. Anyway, we haven’t gotten back to the shed yet. We need to finish cleaning the trim and put it back on. We are then going to clear out the entire shed and bomb it for bugs, maybe twice for good measure. Before we load it back up, we are going to move it. That’s right I said we are moving it. It sits a good 8 feet from the fence and there is no reason for that. It is just wasted space back there. So we want to put it maybe 2 feet from the fence so we just have a little access walkway and gain some 6 feet of yard out of it. It seems like a small thing for such a task, but we both believe it will be worth it. One more thing on the list :)

Table Build:
When we were cleaning out the shop we found a small counter top. Just the top. I want to build a base for it so it can be used. This isn't something I've started so it’s not fair to include it on the ongoing project list, but it is on my mind.

So in case you lost count, excluding the last table mentioned, that is actually 9 projects in the works…two of which that are actually finished. Don’t worry, we've set aside some time in the coming weeks to get some of this stuff wrapped up.


That’s what’s been going on over here, any lingering projects in your house?